
GitHub Actions for absolute beginners
What in the programming world are GitHub actions? Why are they important for me as a developer to know? Where are they even used and do I really have to use them?
Before you begin reading, please ensure that you know what GitHub is and how it works; otherwise, check the side bar for resources.
The problem solved by GitHub actions
Let us say you are working on a big project with other developers. And you are using GitHub to host your project (project files). When each developer in the team makes a change, they push it to GitHub on the specified branch. Before they even push the code to GitHub, they first need to check if the tests pass, if running the build works okay, etc.
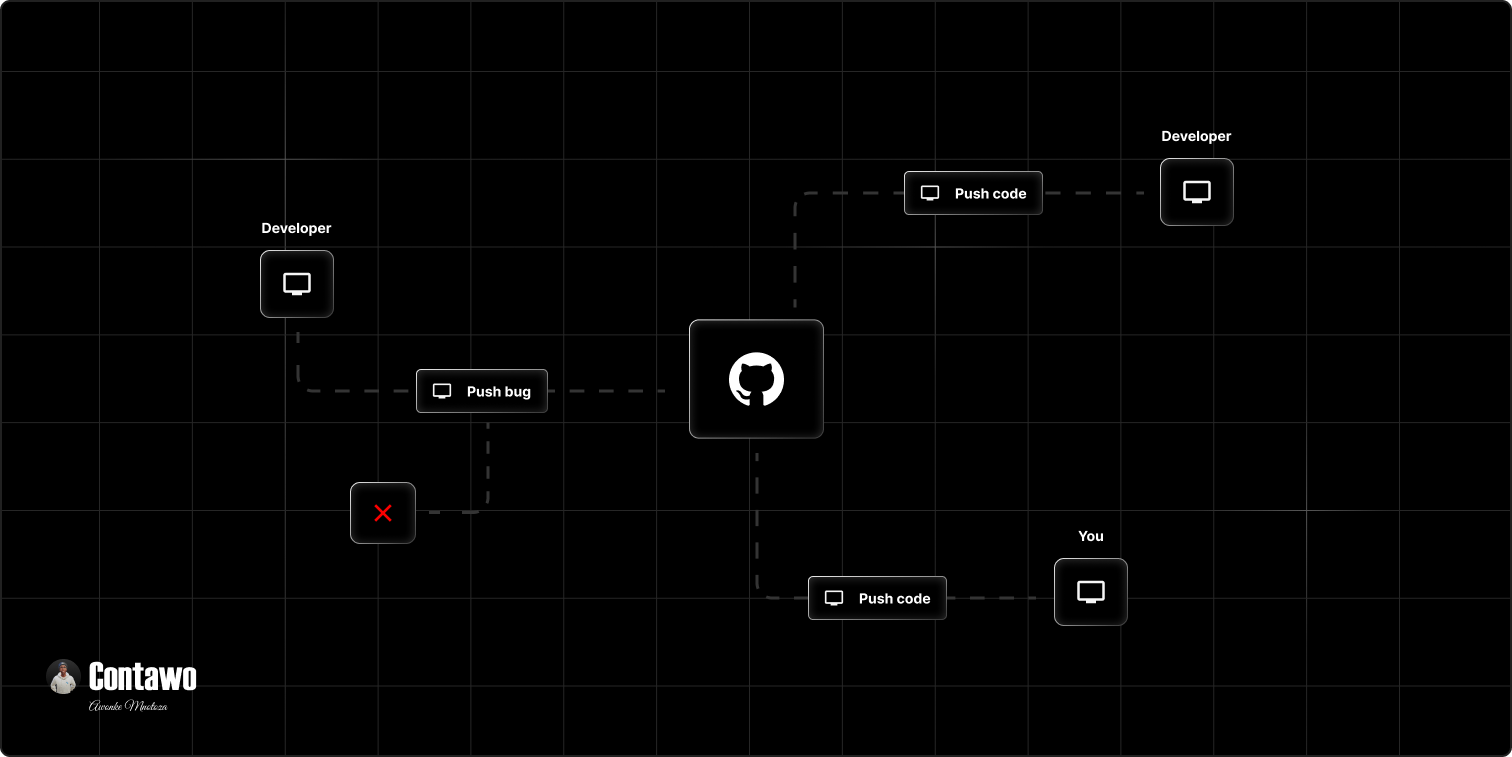
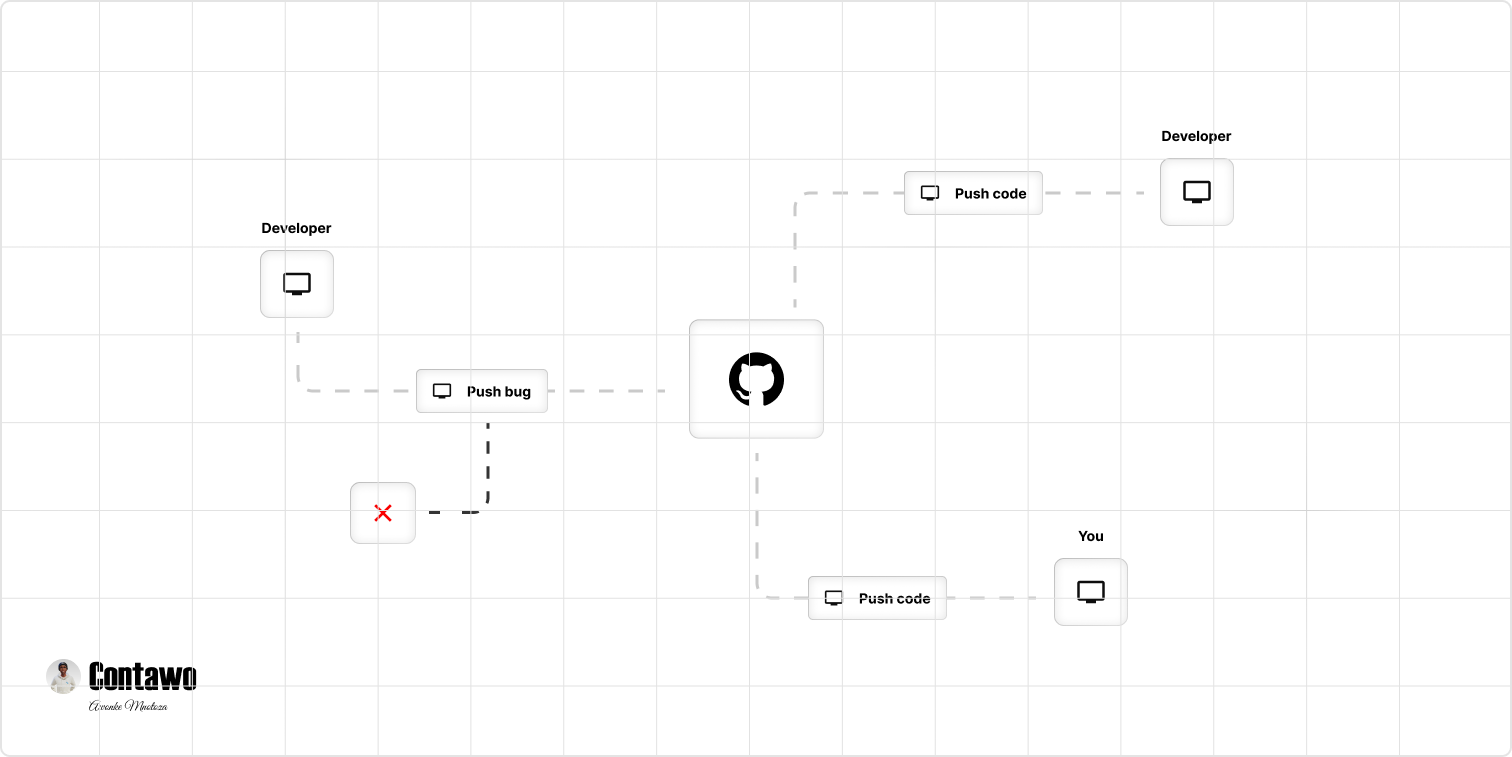
How do you know if the tests and build ran for other developers? How do we keep track of bugs in development? If a certain developer on the team ignores the tests because they have been getting a bug (it happens, trust me), then pushes that “buggy” code to GitHub. That would hurt your production, right?
How do we solve this problem? This is where GitHub actions come in.
GitHub actions in a nutshell
Let’s be fancy with the definition a bit: GitHub Actions is a continuous integration and continuous delivery (CI/CD) platform that allows you to automate your build, test, and deployment pipeline. What does this fancy English mean? GitHub creates a continuous automated system (on a virtual machine) that allows you to run builds, tests, etc. before your code is pushed to any branch. Let us break this down:
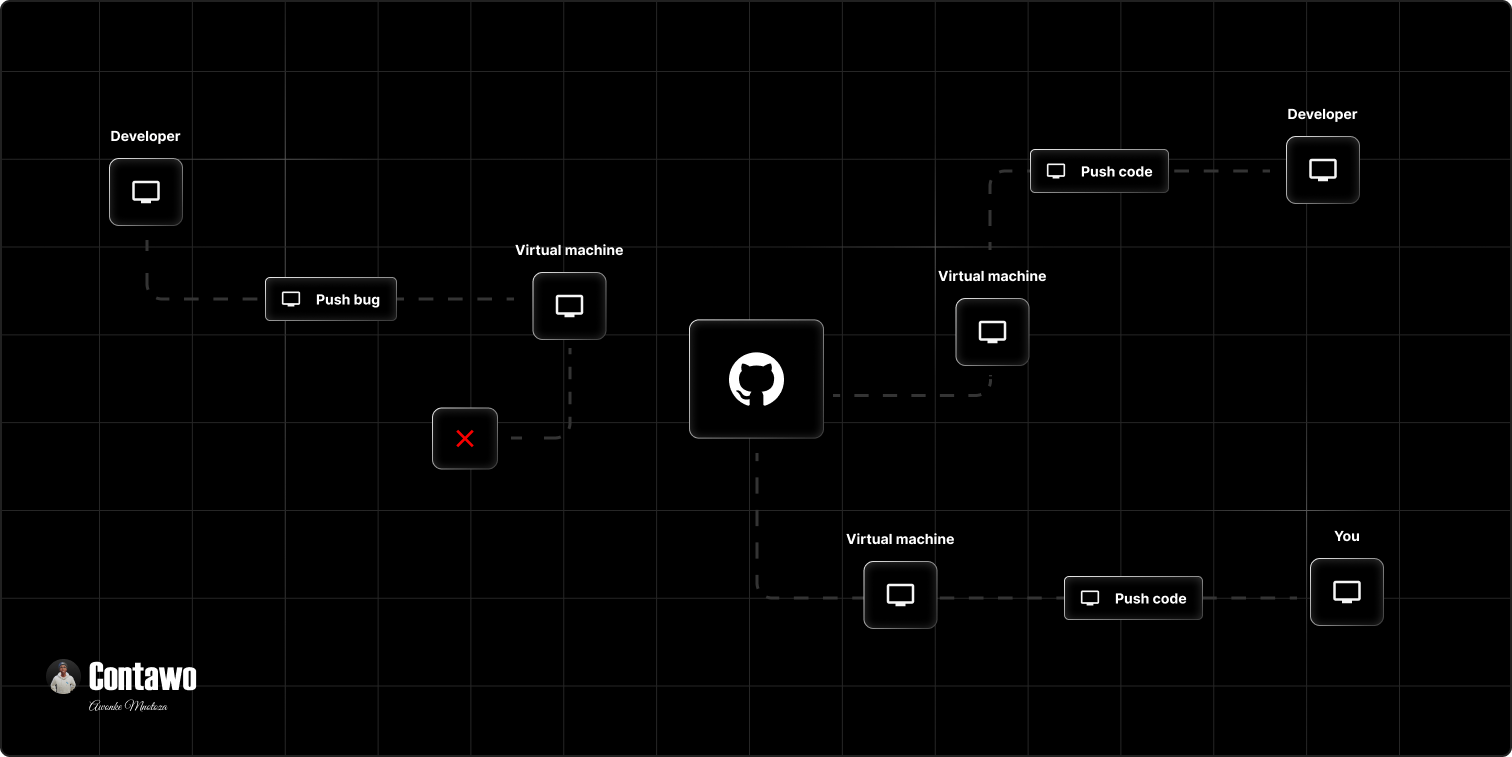
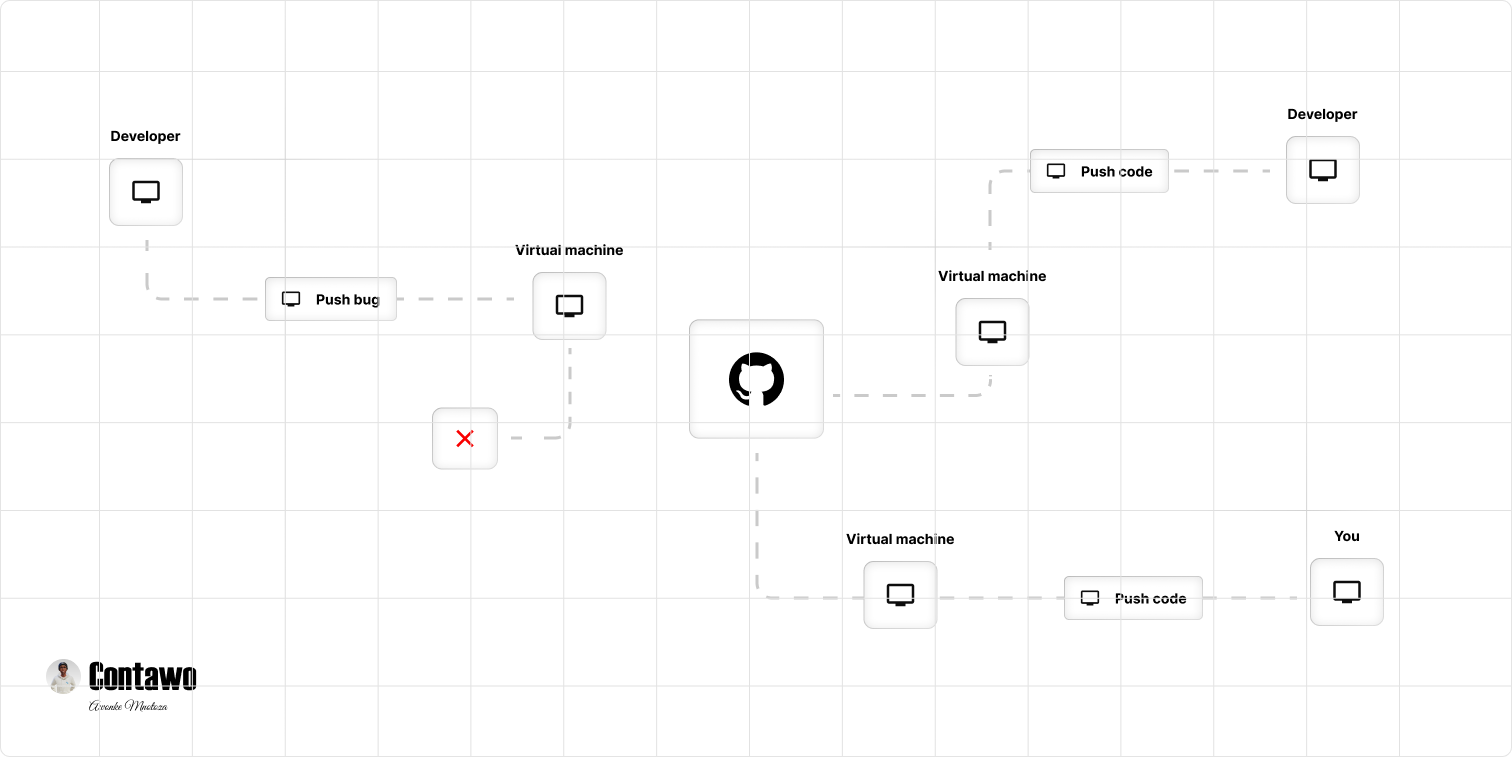
GitHub creates a virtual machine (of your choice), and use that machine to run build or tests or any pipeline you want it to run, on every action (push etc) made to GitHub. For example: Whenever a developers in your team pushes to GitHub, the virtual machines checks if the build is working, the tests are passing etc. This solves the problem of “Trust me bro it works” and leaves you with assurance that the right code will be pushed to GitHub.
Documentations have a lot of English that is confusing at times and also concepts that are barely explained. I really had a hard time digesting what GitHub actions are, so I will be as detailed as I can so that you do not suffer the way I did.
Another way of explaining it
I want you to really understand GitHub actions; if you do, you can skip this part. Let me break it down further. Going back to the example of the team, Each team member has their own machine (laptop or PC). When each one of you wants to push to GitHub, they first check if the tests are all passing as well as the builds on their machines. If one of them lies (or forgets; we do that sometimes) and says the tests passed, you wouldn’t know unless you saw it on his or her machine.
GitHub Actions solves this by creating a virtual machine that will run the tests, builds, and other pipelines on the code that each member pushes to GitHub. Everyone in the team will be able to see if the tests and builds have passed or not. I am explaining this so that it sinks in, because it is very important to understand before you read below. Meditate on it if you have to.
Getting started with GitHub actions
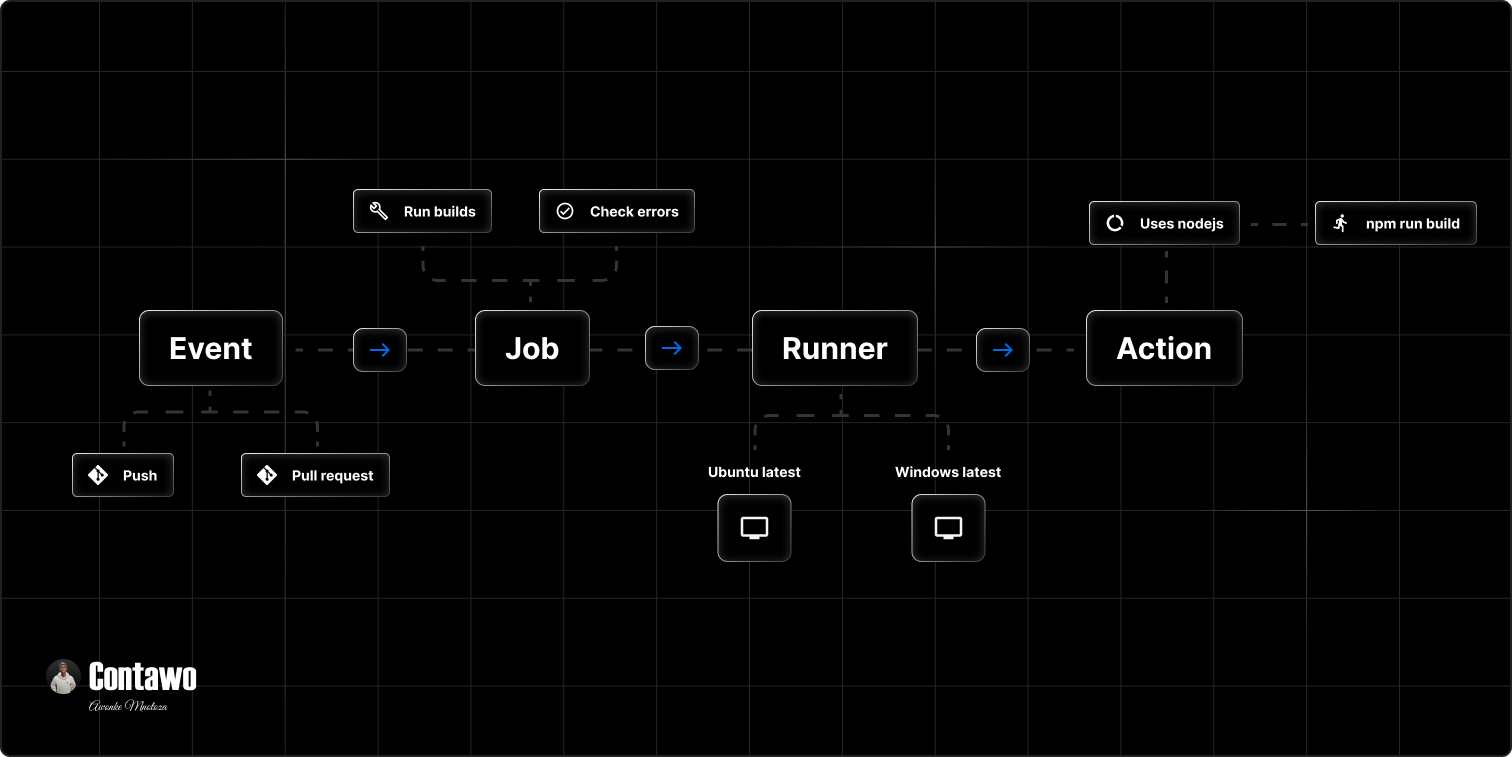
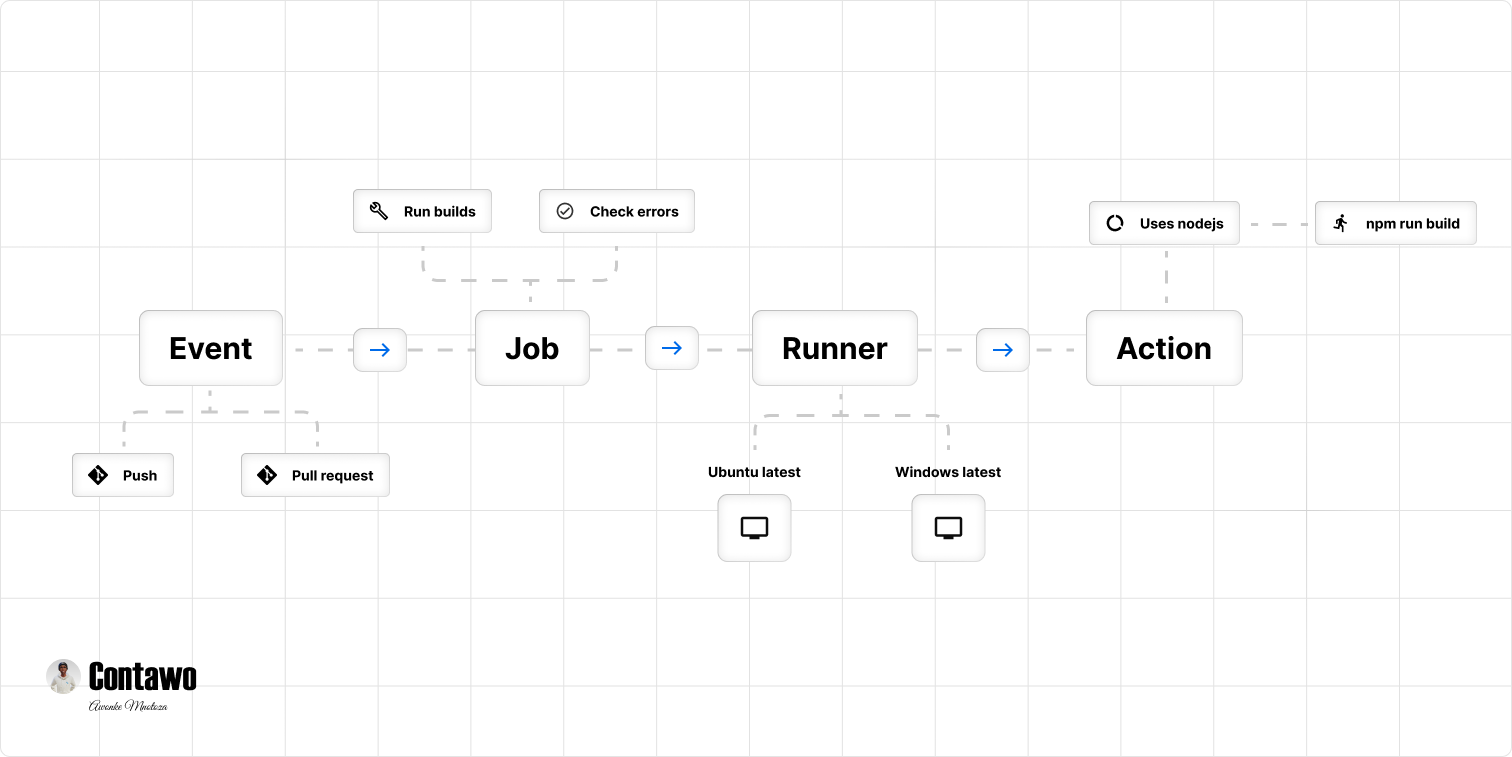
We are going to explore how GitHub actions work. In GitHub, we have workflows, events, jobs, actions, and runners. Let us explore these in detail.
Make sure you know what .yaml is and how to write code for it. You can check the resources on the side bar to learn more about it.
Workflows
That whole process we talked about above (checking code when each developer pushes or creates a pull request, etc.) is a workflow. A workflow is the term used to describe the automated process that you will be creating on your GitHub project. You can create a workflow for deploying your project. You can also write another workflow to run tests and builds. You can also create a workflow that will check every time a new issue is posted, then create a tag for that issue.
Here is an example of a workflow. We will be breaking this down as we move along.
Events
This is a term used to describe the triggers of our workflow. An event could be a pull request, a push request (when a developer pushes code to GitHub), etc. In simple terms, these are what we use to trigger our automated system (workflow). Here is a code example of an event:
That is how an event is created in a workflow. You can explore more events on the GitHub Actions website and play around with them.
The syntax for writing your workflow is very important. The order is also important. But you can be stubborn and learn the hard way.
Jobs
These are the processes and steps that are run when an event is triggered. These are executed according to the order in which they are written. Here is an example of a job.
That is all you need to know about jobs, but you can learn more on the GitHub Actions website and explore other possibilities. Let us now understand the steps of the job.
Runners
Remember that each workflow runs on a virtual machine. We specify the kind of machine we want our workflow to run on. For every job, we need to specify the type of virtual machine our workflow runs-on. Each runner can run a single job at a time. This means that if you have three runners, the job will be done three times. Here is an example:
Actions
I think you will need water for this one, because I drank a lot from my side. Relax, I am kidding. Let me break it down. Remember, we are using a virtual machine. When we use our machines, we have already installed Nodejs, and Git. We basically have everything we need.
The virtual machine does not have these installed (they are basically "empty"); hence, we need to install them on our virtual machines. How do we do that? For us to accomplish that, we have to write a lot of complex code, which is not an easy task, my friend. That is where actions come in.
Actions, in simple terms, are processes that the virtual machine uses to configure the environment and run our code. These are already coded for us, so we do not need to code them ourselves; we just simply use them.
You can view more actions on the GitHub actions marketplace. There are a lot of actions you can find there.
To understand actions further, Let us say you are working on a Python project. You can simply set up your actions like this:
You can configure anything with these actions. Whether you're working on a C++ project or a Nextjs project, there are actions available to help you setup the environment for your virtual machine.
You always want to use the actions/checkout because your machines need to be able to navigate through all your branches to perform the tasks. Always keep this in mind. Again, I repeat, always use the actions/checkout.
Let us focus on the running part of our actions.
You can check all the workflows on the actions tab in your GitHub repository. But if you are a developer, you will figure out where to find the workflows.
Conclusion
That is all you need to get started with GitHub Actions. You can extend your knowledge from this by reading the documentation; all the best with that. I hope you now know why GitHub actions are important and why we should use them, especially when working as a team. If you are still confused, comment on the side bar. Also, comment with any suggestions you have or anything you want to say. Your comment will also help another developer reading this blog. Happy coding, and have a lovely day as well as a productive week ahead.